
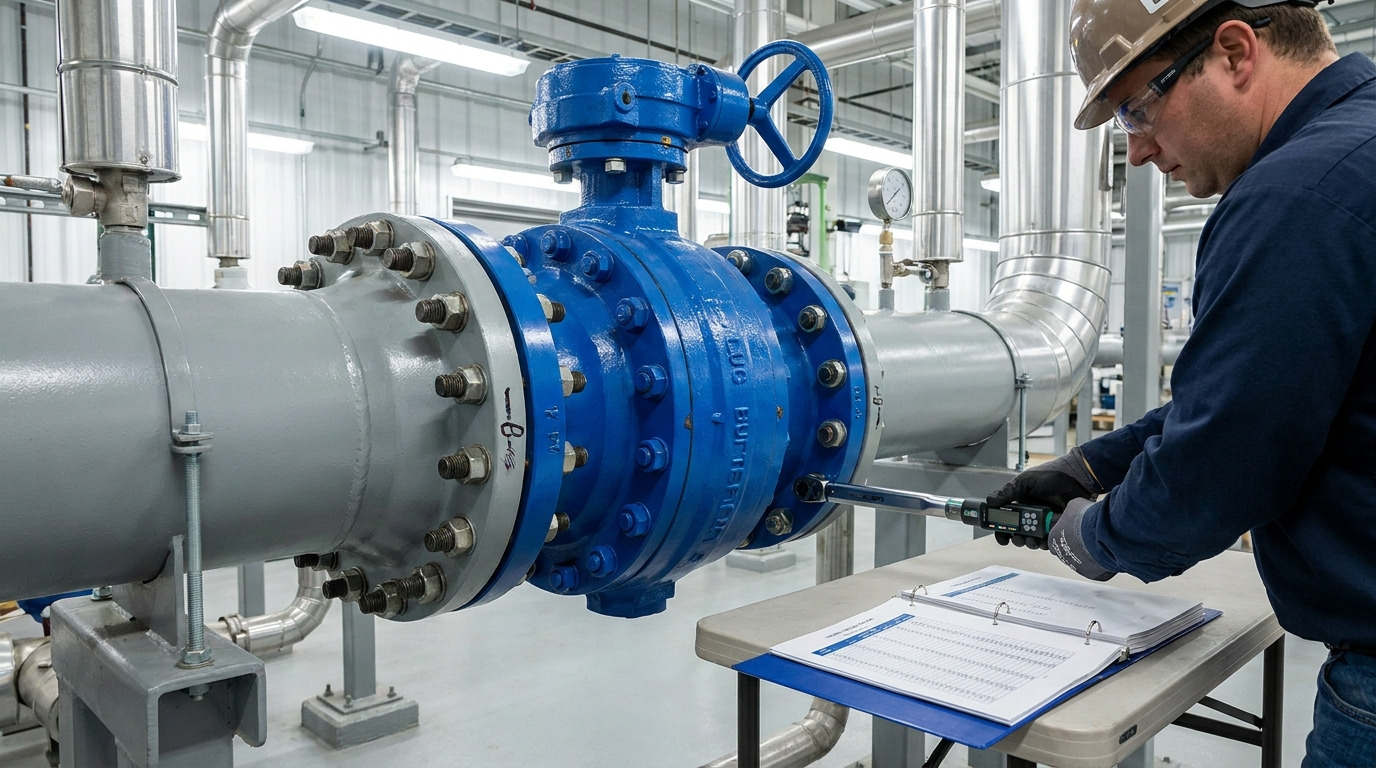
A complete guide on valve installation using a butterfly valve bolt chart involves selecting the precise bolt sizes, materials, and torque values to secure your piping system. You know the frustration of a leaking pipeline right after startup. A tiny misalignment or the wrong bolt tension can cause catastrophic blowouts, ruining hours of hard labor and costing thousands in downtime. Fortunately, there is a simple way to prevent this chaos. By following a reliable lug butterfly valve bolt chart, you can achieve a perfect, leak-free seal every time.
What Is a Lug Butterfly Valve Bolt Chart Used For?
A lug butterfly valve bolt chart is used to determine the exact bolt dimensions and specifications needed to connect valves to flanges securely. You will find that referencing a lug butterfly valve bolt chart takes the guesswork out of industrial piping assembly. It provides clarity on torque limits and material grades required for high-pressure systems. Without this critical reference, you risk catastrophic joint failure and severe fluid leaks.
What Components Make Up the Valve?
Understanding the valve body is your initial step to mastering fluid control. The main housing contains a central disc, a sealing seat, and an actuator stem. Here’s the deal: each part relies on precise bolt tension to remain perfectly aligned under pressure.
- The actuator controls the disc movement.
- The rubber or metal seat secures a tight seal.
- The outer body lugs hold the threaded bolts.
How Do Bolts Secure Safety?
Bolts act as the primary anchoring mechanism against extreme internal pressure. By clamping the flanges tightly against the valve body, they prevent hazardous blowouts in harsh environments. You might be wondering: what happens if the bolts yield? The system will rapidly depressurize, posing massive safety risks to nearby operators.
Key Takeaway: Always verify your components against the chart to guarantee uncompromised safety and operational stability.
| Parameter | Description | Function |
|---|---|---|
| Bolt Grade | Material strength rating | Prevents shearing |
| Seat Type | Elastomer or metal | Dictates seal quality |
| Body Lugs | Threaded mounting points | Secures the valve |
This table outlines the required hardware parameters that influence the overall structural integrity of your piping network.
Why Trust a Lug Butterfly Valve Bolt Chart?
You should trust a lug butterfly valve bolt chart because it provides standardized, tested engineering data that guarantees leak-free flange connections. When you consult a lug butterfly valve bolt chart, you eliminate dangerous guesswork from your installation procedures. It translates complex mechanical thresholds into simple, actionable numbers for technicians. Relying on this data protects your infrastructure from unexpected ruptures.
Can It Prevent Major Leaks?
Absolutely, following the specific torque values prevents the uneven compression that causes major leaks. When flange faces are unevenly clamped, the internal gasket warps and fails. Ready for the good part? A perfectly aligned joint holds steady even under maximum flow rates.
- Precise torque prevents gasket distortion.
- Correct bolt length guarantees full thread engagement.
- Standardized data removes human error.
Is Standardization Really That Critical?
Using standardized metrics guarantees that every technician applies the exact same force and hardware. This uniformity is strictly required for large-scale operations where multiple contractors handle the piping. What’s the real story? Consistency across your pipeline drastically reduces maintenance emergencies.
Key Takeaway: Relying on verified engineering charts guarantees uniform, leak-free installations across all your industrial fluid systems.
| Benefit | Impact | Reliability |
|---|---|---|
| Leak Prevention | High | Excellent |
| Uniformity | High | Excellent |
| Time Saved | Medium | Good |
These benefits demonstrate exactly why standardizing your installation methods drastically improves pipeline longevity.
How to Read a Lug Butterfly Valve Bolt Chart?
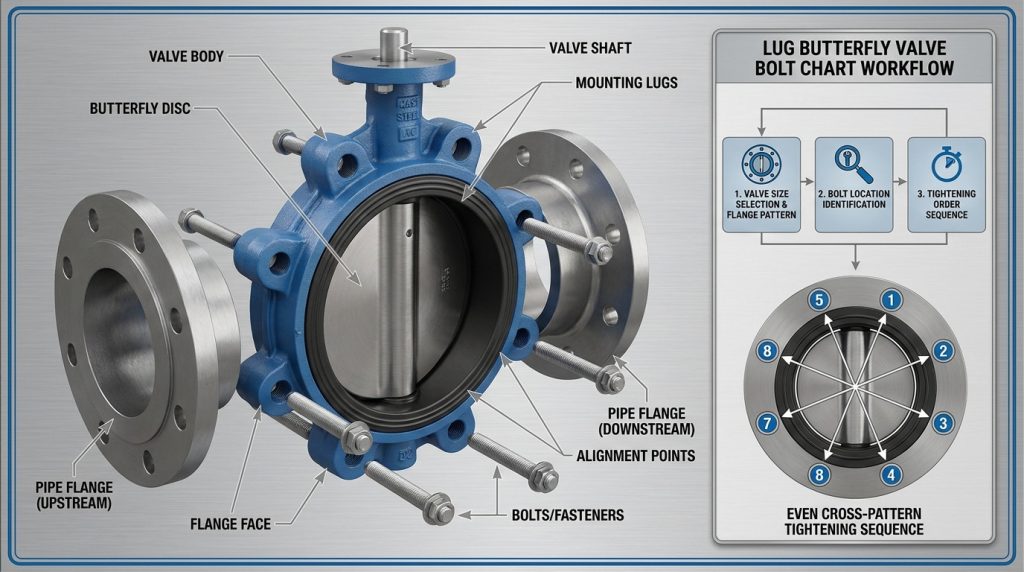
You read a lug butterfly valve bolt chart by matching your valve size and pressure class to the corresponding bolt length and torque columns. Navigating a lug butterfly valve bolt chart is simple once you understand the basic flange rating categories. It clearly lists the diameter, thread pitch, and quantity of fasteners required for each unit. This straightforward matrix guarantees you never order or install the wrong hardware.
What Do the Numbers Mean?
The numbers represent exact physical dimensions and maximum rotational force limits for your wrenches. The diameter indicates the bolt thickness, while the length accounts for the flange and valve body combined. This is where it gets interesting: you just follow the row for your specific pipe size to find everything you need.
- Bolt quantity matches the lug count.
- Length secures proper nut thread protrusion.
- Torque values prevent overtightening.
How Does This Apply to Complex Systems?
In highly corrosive sectors like chemical processing, choosing the right material grade from the chart is just as vital as size. The chart will specify if stainless steel or carbon steel is required for safety. But here’s the kicker: matching the material to the environment stops rust before it starts.
Key Takeaway: Correctly interpreting the rows and columns directly translates to safer, more resilient mechanical joints in any facility.
| Specification | Meaning | Application |
|---|---|---|
| Size (inches) | Pipe diameter | Valve matching |
| Bolt Qty | Number of holes | Assembly |
| Torque (ft-lbs) | Tightening force | Sealing |
This layout decodes the technical specifications so your team can assemble the hardware with total confidence.
What Sizes Are in a Lug Butterfly Valve Bolt Chart?
The sizes in a lug butterfly valve bolt chart typically range from 2 inches up to 24 inches in diameter, matching standard industrial piping dimensions. Every lug butterfly valve bolt chart covers a wide spectrum of flange classes, dictating specific bolt diameters like 5/8-inch or 3/4-inch. These standardized dimensions are based on global engineering codes to secure universal compatibility. Knowing the exact size requirement prevents delays during the final assembly phase.
Are Standard Lengths Required?
Yes, using the standard lengths specified guarantees that the bolt fully engages the threads without bottoming out. If a stud is too short, it weakens the joint, and if it is too long, it may block adjacent equipment. Here’s the deal: the chart calculates the exact flange thickness plus the valve width for you.
- Eliminates manual measurements.
- Prevents loose connections.
- Guarantees clearance for tools.
Why Do Sizes Vary by Pressure?
Higher pressure classes demand thicker, stronger bolts to withstand the increased internal forces. A Class 150 flange will use smaller hardware than a Class 300 flange, even on the same pipe diameter. You might be wondering: can you mix them up? Doing so will instantly compromise the system’s pressure rating.
Key Takeaway: Always verify both the physical pipe diameter and the pressure class to select the correct fastener dimensions.
| Valve Size | Pressure Class | Bolt Diameter |
|---|---|---|
| 2 inch | Class 150 | 5/8 inch |
| 4 inch | Class 150 | 5/8 inch |
| 6 inch | Class 300 | 3/4 inch |
This matrix illustrates how fastener dimensions scale proportionally with both pipeline diameter and operating pressure limits.
How to Prep With a Lug Butterfly Valve Bolt Chart?
You prepare by gathering the exact fasteners, tools, and gaskets listed in the lug butterfly valve bolt chart before bringing the piping together. Using a lug butterfly valve bolt chart during your prep phase guarantees that your workstation is fully stocked. It allows technicians to stage the correct stainless or carbon steel hardware right next to the installation zone. Proper preparation drastically reduces the time your pipeline remains offline.
What Should You Inspect Initially?
Always inspect the flange faces for deep scratches, rust, or debris that could ruin the gasket seal. Even the perfect bolt torque cannot fix a damaged or dirty mating surface. What’s the real story? A clean surface is just as critical as the bolts themselves.
- Wipe down all metal surfaces.
- Check lugs for thread damage.
- Verify gasket material compatibility.
How Does Environment Affect Prep?
If you are working in demanding fields like mining applications, you must prepare anti-seize compounds to protect the threads from abrasive dust. Environmental factors dictate whether you need coated bolts or specialized lubrication before assembly. Ready for the good part? Preparing the hardware with protective coatings extends the maintenance lifecycle.
Key Takeaway: Thorough inspection and environmental preparation prevent premature wear and guarantee the joint seals perfectly on the try.
| Prep Step | Action Required | Benefit |
|---|---|---|
| Cleaning | Wipe flange faces | Better seal |
| Inspection | Check threads | Prevents jamming |
| Lubrication | Apply anti-seize | Easy removal |
This checklist guarantees that your team addresses all critical pre-installation steps before tightening a single nut.
Steps to Use a Lug Butterfly Valve Bolt Chart?
To use a lug butterfly valve bolt chart, initially identify your valve specs, read the required bolt dimensions, and then apply the listed torque values in a star pattern. A reliable lug butterfly valve bolt chart acts as a step-by-step blueprint during the actual tightening phase. It tells you exactly how much force to apply in incremental stages so the gasket compresses evenly. Following these logical steps eliminates the risk of cracking the valve body.
How to Align the Flanges?
Carefully center the valve between the flanges so the threaded lugs line up perfectly with the pipe holes. Misalignment causes the bolts to bind, which gives a false torque reading on your wrench. This is where it gets interesting: the bolts slide in effortlessly by hand when the alignment is dead-on.
- Support the valve weight securely.
- Insert alignment pins if necessary.
- Thread the initial few bolts loosely.
Why Tighten in Increments?
Tightening in increments prevents the gasket from pinching on one side and leaking on the other. You should apply 30% of the final torque, then 60%, and ultimately 100% across all bolts. But here’s the kicker: the star pattern distributes the mechanical load evenly across the entire circumference.
Key Takeaway: Staged tightening using a crisscross pattern is the ultimate secret to achieving a flawless, high-pressure seal.
| Step | Torque Target | Pattern |
|---|---|---|
| 1 | 30% | Crisscross |
| 2 | 60% | Crisscross |
| 3 | 100% | Circular check |
This staged approach secures uniform gasket compression and safeguards the hardware from uneven mechanical stress.
Why Is Torque Key in a Lug Butterfly Valve Bolt Chart?
Torque is key in a lug butterfly valve bolt chart because it provides the exact clamping force needed to seal the valve without crushing the internal components. When you follow a lug butterfly valve bolt chart, you apply scientifically calculated force rather than relying on physical feel. Correct torque prevents the bolts from vibrating loose during high-flow operations. It is the defining factor between a durable joint and a sudden failure.
What Happens If You Overtighten?
Overtightening stretches the bolts beyond their yield point, permanently weakening the metal and warping the flange. It can also crush the elastomer seat, pushing it into the flow path and obstructing the disc. Here’s the deal: more force does not equal a better seal; it usually ruins the equipment.
- Flanges can bend permanently.
- Bolts may snap under pressure.
- Elastomer seats get destroyed.
Can Undertightening Be Just As Bad?
Yes, undertightening leaves gaps in the seal, allowing highly pressurized media to escape the system. In critical sectors like the marine industry, a loose joint can lead to severe flooding and mechanical failure. You might be wondering: how do you know it is right? You must use a calibrated torque wrench every single time.
Key Takeaway: Strictly adhering to specified torque limits protects expensive hardware and secures the safety of the entire facility.
| Condition | Cause | Result |
|---|---|---|
| Overtightened | Excessive force | Crushed seat |
| Undertightened | Insufficient force | Fluid leakage |
| Optimal | Chart adherence | Perfect seal |
This comparison highlights why hitting the exact mechanical sweet spot is required for long-term pipeline integrity.
What Mistakes Happen With a Lug Butterfly Valve Bolt Chart?
The most common mistake with a lug butterfly valve bolt chart is reading the wrong pressure class column and installing incorrectly sized fasteners. Even with a perfect lug butterfly valve bolt chart, technicians sometimes rush and skip the incremental tightening sequence. Another frequent error is using uncalibrated wrenches, which renders the exact numbers completely useless. Avoiding these careless mistakes is mandatory for maintaining strict industrial safety standards.
Are You Using the Wrong Grade?
Substituting a low-grade carbon steel bolt in a highly corrosive environment leads to rapid oxidation and joint failure. The chart specifies material grades for a reason, and ignoring them invites disaster. What’s the real story? Cheap hardware will cost you thousands in emergency repairs down the road.
- Never mix different bolt grades.
- Verify the steel class before use.
- Avoid uncertified aftermarket parts.
Do You Skip the Star Pattern?
Tightening bolts in a circle rather than a crisscross pattern pushes the gasket out of alignment. This amateur mistake guarantees a leak, even if you use the correct final torque. Ready for the good part? Simply jumping across the flange as you tighten solves this issue instantly.
Key Takeaway: Paying close attention to material specifications and tightening patterns prevents the most common installation failures.
| Mistake | Consequence | Prevention |
|---|---|---|
| Wrong Grade | Rapid corrosion | Check material specs |
| Circular Torque | Gasket blowout | Use star pattern |
| Rushing | Uneven seal | Follow stages |
This breakdown identifies frequent installation errors so your team can proactively avoid costly pipeline downtime.
How Does a Lug Butterfly Valve Bolt Chart Aid Upkeep?
A lug butterfly valve bolt chart aids upkeep by providing the baseline torque values needed for routine maintenance and re-tightening schedules. When performing annual inspections, a lug butterfly valve bolt chart tells your maintenance crew exactly how tight the bolts should still be. Over time, thermal cycling causes metal relaxation, and the chart guides the re-torquing process. It serves as a permanent reference document for the lifespan of the pipeline.
When Should You Re-Torque?
You should check and re-torque the fasteners after the initial few days of operation and during scheduled annual shutdowns. Vibration and temperature swings naturally cause the bolted joints to loosen slightly. This is where it gets interesting: catching this early prevents minor drips from turning into major hazards.
- Re-torque after initial startup.
- Check joints during temperature shifts.
- Include in annual maintenance.
Should You Reuse Old Fasteners?
Never reuse old fasteners if they show signs of stretching, rust, or thread damage after disassembly. The chart assumes you are using fresh, uncompromised steel to achieve the stated clamping force. But here’s the kicker: new hardware is a cheap insurance policy against catastrophic joint failure.
Key Takeaway: Integrating chart specifications into your preventative maintenance routine extends the operational life of your entire fluid system.
| Upkeep Task | Frequency | Action |
|---|---|---|
| Initial Check | 48 hours | Verify torque |
| Visual Inspect | Monthly | Look for rust |
| Replacement | During overhaul | Install new bolts |
This schedule guarantees that the structural integrity established during installation is maintained throughout the system’s operational life.
What Tools Match a Lug Butterfly Valve Bolt Chart?
The primary tool that matches a lug butterfly valve bolt chart is a high-quality, recently calibrated torque wrench. Without the right tools, the precise numbers on a lug butterfly valve bolt chart are impossible to apply accurately. You will also need alignment pins, heavy-duty sockets, and proper thread lubricants to complete the job. Investing in professional-grade equipment guarantees your installation exactly mirrors the engineering specifications.
Is a Torque Wrench Necessary?
Yes, a calibrated torque wrench is absolutely mandatory because human feel cannot accurately gauge specific foot-pounds of force. Relying on an impact drill or a standard breaker bar will almost always result in an improper seal. Here’s the deal: a digital wrench beeps the exact millisecond you hit the perfect tension.
- Use digital or click-style wrenches.
- Calibrate the tool annually.
- Never use impact guns on final passes.
What About Lubricants?
Using the correct anti-seize lubricant on the threads guarantees that the torque reading reflects true clamping force, not friction. The chart’s values often assume a lubricated thread, so installing them dry can result in undertightening. You might be wondering: does the lube type matter? Yes, it must match the environmental temperature and media.
Key Takeaway: Pairing accurate engineering data with calibrated professional tools secures a flawless, leak-proof industrial valve installation.
| Tool | Purpose | Necessity |
|---|---|---|
| Torque Wrench | Applies exact force | Mandatory |
| Alignment Pins | Centers the valve | Recommended |
| Anti-Seize | Reduces friction | Mandatory |
This inventory highlights the exact equipment your technicians need to execute a flawless and safe hardware assembly.
Final Thoughts
A complete guide on valve installation using a butterfly valve bolt chart secures your piping systems against catastrophic leaks and joint failures. By addressing flange alignment issues, preventing uneven torque distribution, and guiding precise material selection, this data protects your industrial infrastructure. We provide the precise, durable fluid control solutions you need to keep operations running smoothly without costly downtime. Connect with our engineering experts to upgrade your systems and contact us today for unparalleled industrial reliability. Ruitoflow stands committed to engineering excellence, safeguarding your pipelines for the future.
FAQ
Q1: Can I use a generic chart for all my installations?
No, you must use the specific chart provided by the manufacturer. Different pressure classes and valve designs require unique hardware dimensions to maintain a proper seal.
Q2: What’s the best way to avoid overtightening the hardware?
Use a calibrated torque wrench and follow the staged tightening sequence. This guarantees the force is applied evenly without exceeding the mechanical limits of the metal.
Q3: How do I know if my fasteners need to be replaced?
Inspect them visually during routine maintenance. If you spot severe rust, stretched threads, or physical deformation, replace them immediately with new components.
Q4: Can I skip applying lubricant to the threads?
No, skipping lubricant drastically increases friction. This leads to false torque readings, meaning the joint will actually be looser than the wrench indicates.
Q5: What’s the best method for tightening the flanges?
Employ a crisscross or star pattern across the face. This evenly compresses the internal gasket, eliminating pinch points and preventing high-pressure leaks.